 Dennis Weaver
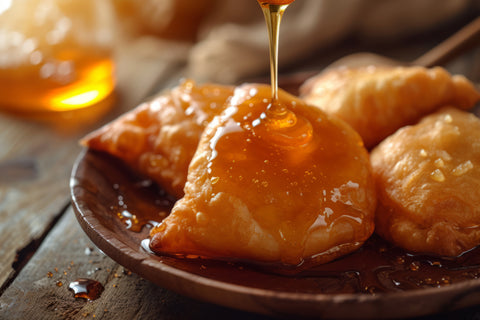
Fry Bread or Scones?
I grew up with fry bread. My mother made bread once a week. If we were around, not out in the fields working, she would set aside some of the dough for fry bread.
It was just bread dough, white homemade bread dough. She would let it rise until it was as puffy as her bread loaves before cooking it. If we weren't around, she might put some of the dough in the refrigerator to slow down the rise, hoping for an evening meal. Sometimes that was tricky, getting the timing right. It has to be completely risen to make fry bread
We didn't call it fry bread. For us, it was scones. It was a regional thing. In the Rocky Mountain states, fried bread dough was called scones. When I moved east, I was surprised to find scones made with baking powder. To me, what they were making were more like biscuits.
Twenty years ago, actually 21 years ago, we moved back to Idaho to start our business. I expected the baking powder scones to have infiltrated the West. And they had, but not nearly to the extent that I expected, Today, many of the better restaurants in the region still serve fried bread as scones.
We're a national business now so we call fried bread, fry bread. And the baking powder concoctions, we love them and we call them scones. But deep in my heart, buried in a lot of warm family memories, I love fry bread.
My Mother's Scones
My mother cooked scones in her cherished frying pan. She didn't put a lot of oil in the pan, maybe an inch. She didn't deep fry them like others did.
She would cut slabs of dough, maybe 3/4 of an inch thick and eased them into the hot oil. She cooked them to a golden brown, turning them once, and then slapping them on plates where we would add butter and syrup.
I had five siblings, four brothers and a caboose of a sister. We could eat piles of fry bread.

Alice's scones
How to Make Fry Bread
Alice wrote the following recipe. It is correct. It's just not the mass production method of my mother. Alice makes pretty little circles or triangles. Mother made big, rough-hewn slabs. Both work.
The big difference is that Mom would handle the risen dough carefully. She would cut the slab and gently slip it into the hot oil. Alice cuts pretty little shapes and then let's them rise. Alice doesn't have a houseful of hungry teenagers.
Alice's Instructions:
- Follow the instructions on your favorite bread mix to prepare a dough. You can make the dough using your bread machine (using the dough setting), stand-type mixer, or simply mixing it by hand.
- On a greased or floured countertop, pat out the dough until it’s about half an inch thick.
- Cut the dough into five-inch wedges and separate the pieces. We’ve found that a pizza cutter works best to slice through the dough.
- Allow the dough to rise until the pieces have doubled in size. To test whether the dough is done rising, poke a dimple into the dough and walk away for two minutes. If the dimple has disappeared after two minutes, then you need to let it continue rising.
- Fill a frying pan with about an inch to an inch and a half of oil.
- Using a deep frying thermometer, heat the oil to 350 degrees. While frying, be sure to keep the temperature between 350 and 375 degrees.
- Carefully picking up the dough, gently place it into the oil. You can fry the dough pieces two at a time in the hot oil. Flip them over once the sides begin to brown.
- Place fried dough onto paper towels to pat away any excess oil or catch any drippings.
- Top with butter, caramel buttermilk syrup, caramel flavored whipped cream and your choice of sliced fruit. Our favorites were sliced strawberries or bananas.
A Note on Rising Your Dough (from Alice)
The preferred temperature for yeast to rise is 79 degrees, but our test kitchen tends towards cooler temperatures, so we have to be creative with reaching that preferred temperature. If we have time, we simply let the dough sit in front of a well-lit window with lots of warm sunlight flooding through.
Another one of our favorite methods is to put the dough on a wire wrack that will allow for air circulation on all sides of the dough and inside a proofing bag. The proofing bag will act like a greenhouse by trapping in the moisture as well as amplify the heat coming from the sunshine or otherwise.
Sometimes, when we’re short on time, we like to cheat by placing it on the dashboard inside the car, or whichever side is facing the sun. The contained heat and sunlight especially speed up the rising process, and depending on the temperature, your dough could be done rising in as little as half an hour or less. Then you can take the heated dough inside, and it should finish rising within five minutes.
Once the dough is done rising, you must be gentle in handling it because you will leave a dent or wrinkle in the proofing. To do this, we recommend using a greased countertop rather than sprinkling it with flour. This way, you’ll be able to use a metal spatula to pick up the dough pieces rather than doing it by hand.
By greasing the countertop rather than sprinkling it with flour, it’s easier to lift the sticky dough pieces from the counter with a spatula, and you won’t have any loose flour bits falling and burning in the hot oil. Another option is to place the dough pieces onto wax paper squares when setting them to rise. You can then lift them from the corners of the wax paper squares and carefully ease them into the oil.

Comments (0)
There are no comments for this article. Be the first one to leave a message!